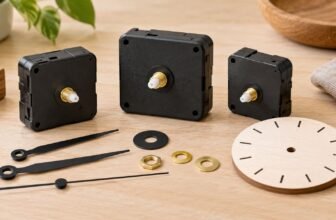
- Top pick: High Torque Clock Movement Kit (Gold).
- High Torque Clock Movement Kit (Black).
- Runner-up: High Torque Clock Movement Kit (Silver).
Quick Picks
Shortlist — fast choices


Fit and noise
Why torque, shaft length, and hand fit matter for gifts
Movement, shafts, and silence
Three mechanical details determine whether a gifted clock works and stays pleasant in use: torque, shaft length, and hand fit.
Torque is the motor’s ability to move weight. Movements labeled high torque are intended for long or heavy hands, thicker dials, and clocks behind glass; choosing too-low torque can cause sluggish timekeeping or stopped hands. Higher torque generally drains batteries slightly faster, but it is often necessary for reliable operation with decorative metal hands.
Shaft length governs whether the movement will clear the dial, washers, and mounting hardware. Measure the dial plus any cover or spacer, then select a shaft that protrudes far enough to accept the washer, nut, and hand without bottoming out. Many easy‑assembly kits offer multiple shaft-length options for frames and floating dials.
Hand fit is the last mile: the hole at the base of the hand must sit snugly on the movement’s arbor. Loose fit causes wobble and inaccurate alignment; too tight can bind the motor. If hands don’t seat properly, swapping to slimmer or heavier-duty hands is usually simpler than replacing the movement.
Regarding motion: sweep (continuous) movements run nearly silent and are preferred for bedrooms and offices, while step (one‑second) motors produce an audible tick and sometimes marginally better battery efficiency. For quiet-gift guidance, see the no-tick kits for bedrooms and gifts.
Common misconceptions: torque does not equal overall build quality, and a silent sweep is not magically immune to poor hand fit—both selection and proper installation matter.
Measure dial thickness and select matching shaft length.
Match torque to hand weight/length; choose high torque for long metal hands.
Prefer sweep for quiet rooms; test hand fit before final assembly.
- Torque and hand compatibility
Movement torque must match the weight and length of the hands; underpowered motors stall or skip. This is a deal‑breaker for low‑stress gifting.
Look forMovement explicitly rated 'high torque' or lists supported hand lengths/weights.AvoidLow‑torque or unspecified motors with heavy or long hands. - Shaft length and mounting
Shaft diameter and threaded length determine whether the movement fits the dial and secures the hands. Incorrect shafts cause loose mounts or unusable kits.
Look forInterchangeable shafts or specified shaft lengths for typical dial thicknesses.AvoidFixed, too‑short shafts or kits lacking mounting hardware. - Hand clearance and stack height
Hands must clear each other and the dial; check hole sizes and the movement’s stack height. Rubbing hands ruin accuracy and increase stress.
Look forClearance specs and compatible hand hole diameters; spacer options.AvoidNo clearance spec or hands that sit too close together. - Tools, finish, and battery stability
Included tools, plated finishes, and a reliable battery contact affect assembly ease and longevity; these are flexible upgrades rather than strict blockers.
Look forNecessary mini‑tools, durable finish, and secure battery compartment.AvoidRequires rare tools or has flimsy battery contacts.
Prioritized, low‑stress checklist:
Deal‑breakers first: torque, correct shaft length, and hand clearance — confirm these before anything else. Next: basic tools included, solid finish, and battery contact reliability; these reduce returns but are optional upgrades.If uncertain about fit, consult a short guide on pick the best kit for a beginner gift before ordering. Small confirmations up front prevent the common last‑minute failures discussed earlier.
- 1. Measure and dry‑fit first
Confirm shaft length, dial thickness, and hand sweep before any permanent fixes. Assemble movement, spacer, dial, and hands by hand to check alignment and clearance.
- 2. Follow this mounting order
Install the movement into the case, add the correct spacer/washer, fit the dial, then secure with the retaining nut. Hand‑tighten—avoid overcompressing the shaft which can bind the movement.
- 3. Set the hands with clearance
Press the hour hand on first, then the minute, then the second (if present). Leave ~1–2 mm between hands and dial; ensure the minute hand clears the hour hand at every position.
- 4. Don’t glue critical parts yet
Use the final nut but skip adhesive on bezels, bezels clips, or decorative elements. Run the movement dry to confirm fit before any permanent glue or caulk.
- 5. 24‑hour run check and quick fixes
Install a fresh battery and observe for 24 hours. If it stalls, check for rubbing hands, bent posts, loose dial, or incorrect shaft depth; rebend or re-seat hands and retry.
Critical pre‑wrap checklist:
Confirm hands don’t rub at 12, 3, 6, 9. Verify second hand sweeps freely (if applicable). Ensure dial is centered and nut snug but not overtightened.Quick troubleshooting:
If it stops: loosen the nut slightly, re‑align hands, replace the battery. If minute hand drifts: press it a touch deeper on the pinion or add a tiny shim under the dial.Featured Movement
Gift‑ready gold high‑torque movement
01 Best for large, decorative DIY clocks
A high‑torque quartz movement aimed at makers assembling large decorative wall clocks as presents. Best suited to builds where appearance and a short assembly window matter.
- High‑torque motor can drive long, decorative hands
- Hook/long‑shaft mounting
- Shaft length may still be insufficient for very deep or layered dials
- Designed for indoor use only
Confirm shaft length for unusually deep dials.
Sleek silver finish for modern decor
A high‑torque quartz movement with 12″ spade hands.
- High torque for long hands
- Sleek modern silver aesthetic
- No battery included
Verify shaft depth and hand clearance before final assembly.
Finishing
Small moves that make a kit feel gift‑grade
Finish like a pro
Final touches that read as premium
Start with simple surface prep: lightly sand edges with 220–320 grit, remove dust with a tack cloth, and match the clock hands’ finish to the dial or frame using a single, consistent technique (spray, brush, or a metal marker for small touch-ups). A matched hand finish immediately lifts perceived quality.
Hide the battery compartment and wiring. Recess the movement slightly or add a thin felt disc so the compartment sits flush; secure loose wiring with a small cable tie tucked into the recess. For gifts intended for bedrooms, choose a sweep (quiet) movement and add a tiny felt pad behind the movement to dampen case buzz.
Include a printed care/setup card with: battery type, hand clearance reminder, first‑run check, and a simple silhouette showing hand order. For layout inspiration, consult the finishing tips for gift clocks.
Packaging cues to reduce friction: label the battery slot, include a replacement battery, and add a bold “set hands before inserting battery” sticker so first use is painless.
Include one easy-to-follow diagram.
Tuck a spare AA/AAA under the card.
Add a small foam strip to stop rattle.
Conclusion
Final picks and a quick finishing workflow
- Gold top pick: best for upscale gifts and long hands.
- Black budget option: retains drive; ideal for tight budgets or DIY cosmetic tweaks and custom hands.
Choose a quick pick by recipient, room style, and hand length. The Gold High Torque Movement suits elegant, long‑hand designs and ready‑to‑gift builds. The Silver runner‑up matches clean, modern faces but needs careful hand selection; the Black budget kit is the practical choice for economical or heavily customized projects.
Follow the workflow: dry‑fit, mount in order, set hands with 1–2 mm clearance, run a 24‑hour check, then secure. Before wrapping, apply one finishing touch—hide the battery, match hand finish, or tuck in a short care card—to elevate presentation. See the related workshop upgrades and electronics resources below to add laser‑cut faces, 3D gears, or an RTC module.




Related Guides: Clock Kits

Wall Clock Movement Kits