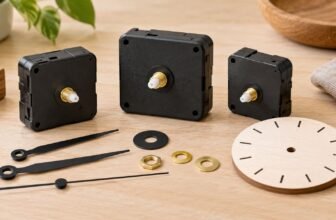
- Six-Movement Clock Kit with Ten Hand Options — best for full conversions and hand variety.
- Quartz DIY Clock Movement with Gold Hands — compact, attractive option for budget-friendly swaps.
- Quartz DIY Clock Movement with Hands — reliable runner-up for straightforward replacements.
Quick Picks
Three immediate options


Selection criteria
Measurable compatibility checks for open‑dial conversions
Measure total spindle length, threaded length, and exposed shaft beyond the dial in millimetres; record thread type and shoulder position to confirm fit for washers, nuts, and spacers.
Measure hour/minute/second arbor diameters and hand hole bores (mm); verify press-fit tolerances and whether adapters are required.
Check vendor torque spec (mN·m or gf·cm) and confirm with a simple load test using a known mass at the hand tip to simulate windage and weight.
Measure movement depth, dial thickness, and hand-to-glass clearance to ensure hands rotate freely and mounting screws align with the enclosure.
How each kit was tested
Reviews prioritized compatibility first, then verified torque and recorded real install time to reflect common conversion hurdles.
- Mock‑fit (compatibility‑first)
Physically fit the movement to the dial and hands to confirm spindle length, arbor fit, and mounting alignment before electrical testing.
- Torque / load checks
Mount a hand and hang a calibrated mass at the tip to observe step loss or stall and compare against the movement’s torque spec.
- Timed install
Record total bench install time including any trimming, spacer fitting, or adapter use to indicate real-world effort.
Quartz-swap
Low-risk, time-efficient quartz-swap workflow
- 1) Measure and prepare
Record spindle length (from movement flange to tip), threaded shaft diameter, dial hole diameter, and dial thickness. Gather measuring tools (digital calipers), a dial protector, and a small parts tray to prevent loss.
- 2) Remove hands and original movement
Protect the dial with a plastic sheet or dedicated protector. Remove hands with a hand puller, label hour/minute/second positions if needed, then unfasten and remove the movement while leaving the case and dial untouched.
- Mock-fit replacement movement
Slip the replacement movement behind the dial and engage the spindle without forcing; check that threaded shaft protrusion matches the dial thickness plus any washer. Verify hand clearance to glass and that the hour wheel seats cleanly; test rotation by turning the minute wheel by hand to ensure no binding.
- Micro-adjust spacing and torque
Resolve slight mismatches with stacked brass/nylon washers or a thin movement washer rather than altering the dial. For shallow dials use a shaft/tube extender; for thin dials use a shorter washer stack. Adjust hand feet tension (gentle squeeze) and set the second hand press depth so the sweep clears but remains centered.
- 5) Final test and reassembly
Install recommended battery and run a 24‑hour load test with the heaviest intended hands fitted. Recheck timekeeping, hand alignment at 12:00, and glass clearance before resealing the case.
Prefer washers and extenders for fit tweaks; avoid modifying the dial or case unless absolutely necessary.
Essentials:
Digital calipers, hand puller, dial protector, fine tweezers. Movement holder, small screwdrivers (#00–#1), needle-nose pliers.Fit parts:
Assorted brass/nylon washers, thin movement washer, tube/shaft extenders, extra hands.Quick reminders:
Always test-fit before final fastening. Avoid adhesives on the dial; spacers are reversible and low‑risk. If torque seems weak with heavier hands, choose a movement rated for higher torque (refer to kit specs).Scope & Fabrication
Scope, plate choices, and when to fabricate parts
- Define the visual and mechanical scope
Decide whether the goal is a partial skeleton (cut away dial and reveal the center train) or a full visible‑train rebuild (expose barrels, gear train, and escapement). The chosen scope determines how many original plates must be altered or replaced and how much structural rework is needed.
- Which plates to remove or replace
Front dial plates and decorative masks are commonly removed; for a visible train, the front plate and some bridges are replaced with openwork equivalents. Keep at least one solid reference plate or mocked pillars to preserve arbor geometry and endshake during the conversion.
- Match arbors, pivots and gear ratios
Measure pivot diameters, arbor lengths, and the minute‑to‑hour reduction (cannon pinion/center wheel relationship) before cutting anything. Any change to arbor spacing or gear ratio requires matching parts or reworking pinions so timekeeping geometry remains correct.
- Decide fabrication method and tolerances
Use laser cutting for thin decorative plates or acrylic dial rings, CNC for metal plates/bridges, and 3D printing for prototypes or complex spacers. Aim for pivot hole tolerances within ±0.05 mm for metalwork; printed parts can be +0.1–0.3 mm and used as trial fits.
- Prototype, test, and choose DIY vs outsource
Mock up with temporary spacers and test train meshing, endshake, and torque before committing to final materials. Outsource when antique movements, hardened steel pivots, or sub‑0.05 mm tolerances are required; DIY is reasonable for decorative cuts, acrylic parts, and noncritical bridges.
Document dimensions and make scale drawings before any irreversible cutting.
Quick tolerances and fabrication triggers
Pivot hole tolerance targets: metal ±0.03–0.05 mm, printed ±0.1–0.3 mm. Minimum clearance: 0.2–0.4 mm between wheel teeth and new bridge edges to avoid binding. Use bearings or bushings if replacing hardened pivot holes.For repeatable decorative pieces, plan vector files for laser cut parts for skeleton faces and iterate with printed prototypes before committing to brass or aluminium plates.
Top pick overview
Versatile multi‑movement kit for conversions
01 Great DIY kit for repairs and creativity
A six‑movement set bundled with ten pairs of hands and three spindle lengths aimed at hobbyists and small‑shop restorers. Suits projects that need options—multiple shaft lengths, varied hand styles, and spare movements for testing or backup—without committing to a single replacement part. Ideal when an exposed dial or custom face will be shown off and appearance plus fit must both be dialed in.
- Multiple spindle lengths cover common panel thicknesses
- Ten hand pairs let aesthetic and clearance testing
- Six movements provide spares and parallel trial fits
- Good torque for standard decorative hands
- Not all exotic hand weights are supported—heavy metal hands may need higher torque
- Some installs still require trimming or spacers for perfect clearance
- Gaskets and finishing bits included but custom plates may still be necessary
The kit’s variety of spindles and hands reduces guesswork during open‑dial conversions, letting craftsmen trial different clearances and aesthetics before committing. Compatibility checks remain essential: verify thread length, shaft diameter, panel thickness, hand clearance, and torque against chosen hands. For heavy or oversized hands, plan for a higher‑torque movement or lightweight substitutes. Overall, the kit accelerates testing and provides spares that minimize downtime.
Budget long‑spindle option
Budget long‑spindle quartz for quick swaps
- Very low cost and simple to install for fast repairs
- Long spindle accommodates thicker dials and open‑face mounts
- Ships with multiple hands and basic mounting hardware
- Useful when movement will be visible and aesthetics are secondary
- Limited torque — may not drive heavy brass or oversized hands
- Fixed shaft and thread lengths require precise fit verification
- Minimal sealing or protection for exposed installations
- Basic accuracy and durability compared with higher‑end movements
Runner-up
Practical long‑spindle DIY movement for exposed dials
Essential replacement movement kit
A middle‑ground movement kit that balances affordability with useful build features for visible, open‑dial clocks. Suited to hobbyists and repairers needing a longer spindle, included hands, and straightforward mounting without committing to a high‑torque specialist movement. Good choice when appearance and fit matter more than maximum torque.
- Includes multiple hour/minute hands and mounting hardware
- Long spindle fits thicker or exposed dials (fits hands up to ~450 mm)
- Better build and mounting hardware than ultra‑budget swaps
- Modest torque—may struggle with very heavy metal hands
- Not rated for outdoor or weather‑exposed installations
- Batteries not included; some careful hand alignment required
Troubleshooting
Troubleshooting After a Skeleton Conversion
Hands rub or stop when moved?
Rotate the hands by hand to locate the rub. Bend hand feet slightly or swap in thinner hubs/spacers or lighter kit hands to restore clearance. Seek a clockmaker if arbors are bent or hand posts require replacement.
Movement stops intermittently or won't run?
Confirm a fresh battery and clean contacts; orientation and corrosion are common culprits. If a quartz movement still stalls, test with a budget long‑spindle movement to separate torque problems from gear failure. Refer to a professional for worn pivots, broken pinions, or mainspring faults.
Clock runs fast or slow after conversion?
For pendulum conversions, fine‑tune length and ensure correct beat—see regulating your converted pendulum. For quartz swaps, check hand engagement and that the stepper motor isn’t missing steps. Persistent or erratic drift warrants an escapement inspection by a clockmaker.
Shaft wobble or loose mounting?
Verify mounting nut torque and stabilize the shaft with thin washers or a longer threaded adapter. Replace stripped movement mounts or fabricate a simple adapter plate for panel thickness. Send to a specialist when bushing, reaming, or plate realignment is needed.
Hands stall under load or movement seems weak?
Test with lighter hands; many kits include lighter options or allow swaps to higher‑torque units. If a higher‑torque movement (for example, a multi‑movement kit) still stalls, the fault is internal and should be diagnosed by a professional.
Myths & Fixes
Common conversion misconceptions and how to avoid them
Spindle length alone isn’t enough; flange position, hand sweep, and clearance determine a proper fit.
Mock‑fit the movement, verify flange location and hand arc, and run a torque/load check before final mounting.
Many quartz movements use stepper motors that produce audible ticks; only sweep or higher‑quality motors are quieter.
Open dials amplify sound—choose a continuous‑sweep motor or add thin foam damping to the movement mount.
Heavy or long hands increase torque demand and can slow or stop low‑torque movements.
Match hand mass to movement torque: use high‑torque replacements or lighter hands from multi‑hand kits.
Removing material can weaken mounting points and change vibration paths, leading to slippage or timing drift.
Reinforce cut areas with thin brass plates, add bushings, or use 3D printed gears for skeleton clocks to restore geometry.
Recommendations
Quick recommendations and immediate checklist
- Measure spindle length, panel thickness, and hand clearance before buying anything.
- Choose a kit that matches spindle length and torque needs rather than relying on appearance alone.
- Dry‑fit movement and hands to confirm clearance and rotation before cutting or gluing mounts on permanently.
Top practical picks: The Six-Movement Clock Kit with Ten Hand Options suits full rebuilds and decorative skeleton displays — multiple shafts and hand sizes make it ideal for large, creative exposed dials. The Quartz DIY Clock Movement with Gold Hands is the best budget-friendly choice for fast, attractive no‑cut swaps; confirm spindle length and torque. The Quartz DIY Clock Movement with Hands is a reliable runner‑up for straightforward midrange conversions.
Five-step prioritized checklist and next step: 1) Measure shaft, panel thickness, and clearance. 2) Pick the kit that matches those measurements and required torque. 3) Dry‑fit movement and hands (mock install). 4) Verify torque, hand clearance, and rotation over several minutes. 5) Finish mounts, reinforce as needed, and secure anti‑twist hardware. For a quick swap, start with the budget gold‑hands movement; for bespoke multi‑hand or artistic skeletons, start with the six‑movement kit; for typical replacements use the runner‑up. Begin with precise measurements and a dry‑fit so the rest follows smoothly.